First steps
How to add frames, pick the keepers, build your own look and get a print. This is an introduction, not a reference: what lives where and in what order the work goes. What each knob does is quicker to learn by hand — take one frame and turn things.
On Windows it is all the same, and the screenshots here are from a Mac: Ctrl instead of ⌘, Alt instead of ⌥, Delete instead of ⌫, Explorer instead of the Finder. The library lives in your account’s Pictures folder (%USERPROFILE%\Pictures), even if the system Pictures folder has been moved to OneDrive. The first launch on Windows, step by step, is on the Zerno on Windows page.
How the program is laid out
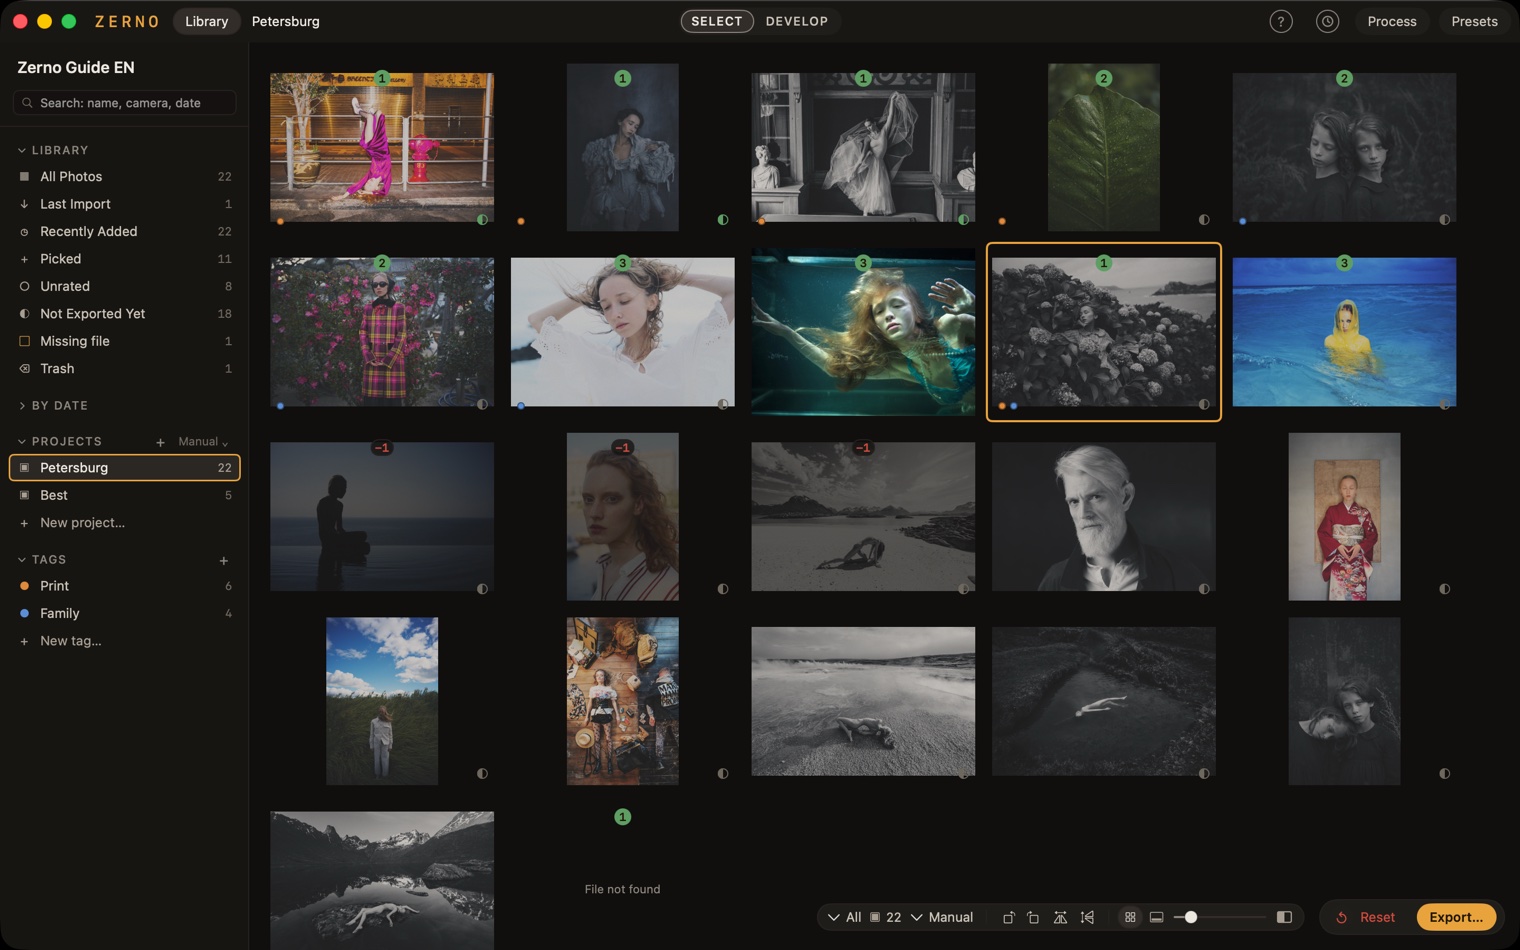
Zerno has two screens. SELECT is a contact sheet: frames in a grid, this is where you pick. DEVELOP is one frame filling the window, this is where you finish it. The switch sits in the middle of the window’s title bar, the keys are ⌘1 and ⌘2; Space opens the frame under the cursor and takes you back to the grid.
All frames live in one library — “Zerno Library” in the Pictures folder. It stores not pixels but what you have done with the frames: ratings, projects, tags, the process, the crop and the history of edits. The photographs themselves stay where they were — Zerno neither copies nor touches them, and a print only appears when you export. There is nothing to save: every change is written at once.
On the left of SELECT is the Library panel: it decides what the grid shows — all photos, recent ones, one of the projects or a tag. On the right, on both screens, there are up to three panels, each with its own button in the title bar: Process (the rack), Presets and History (the round clock icon). Open any of them, even all at once; each screen keeps its own set of open panels, and the program remembers it.
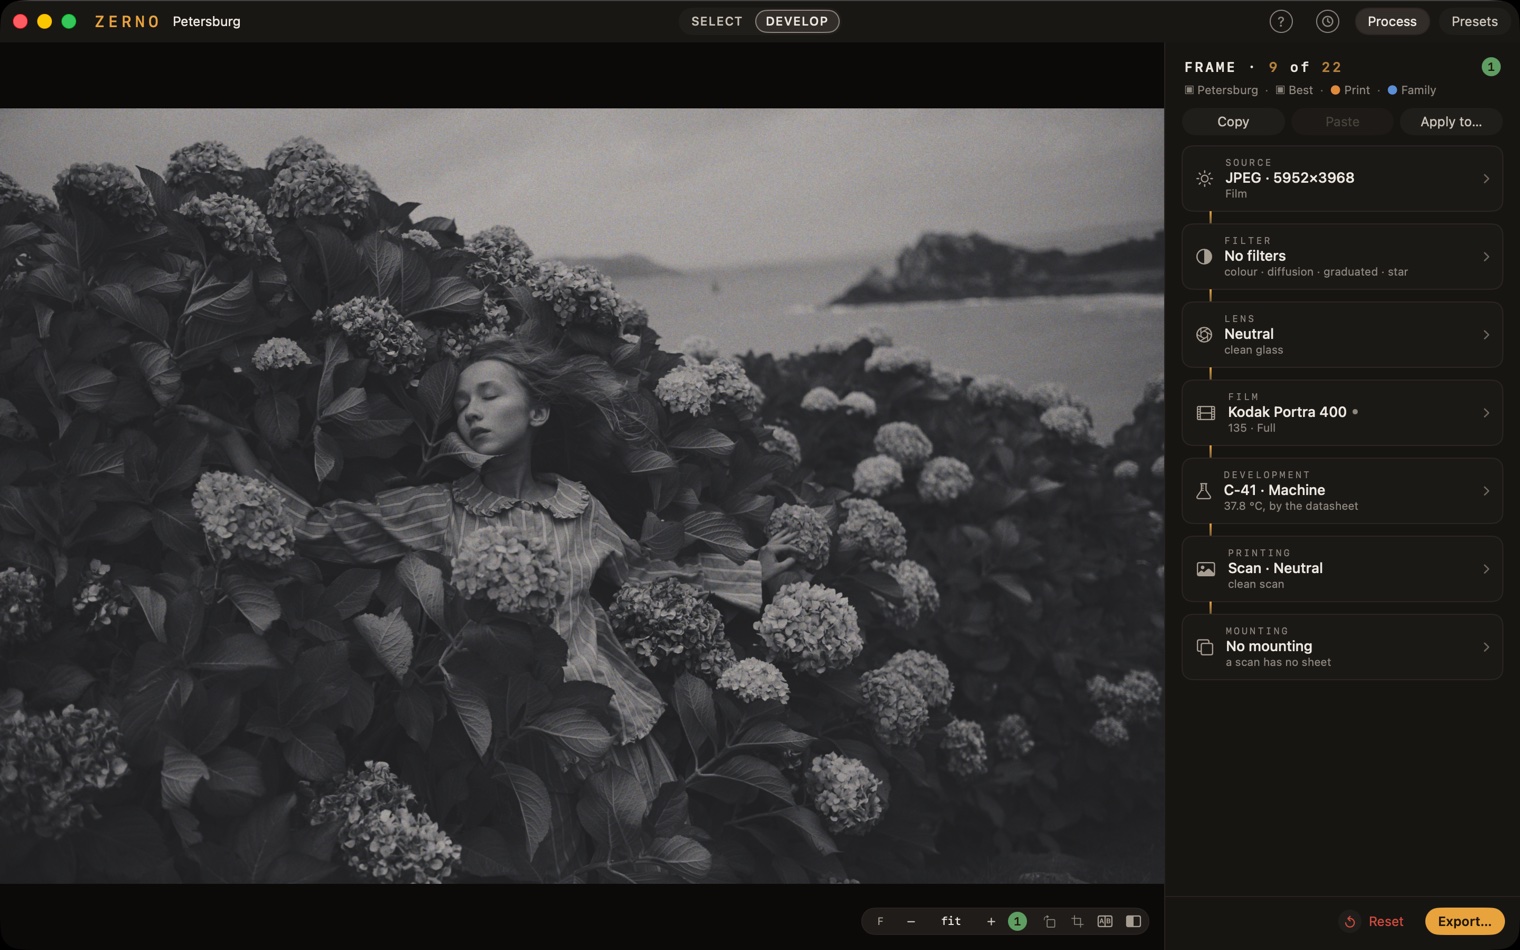
The process rack reads from top to bottom — the way light travels from the scene to the print: SOURCE · FILTER · LENS · FILM · DEVELOPMENT · PRINTING · MOUNTING. Whatever you change, you change a link in that chain, not “the picture”.
Forgot where something is? The ? button in the title bar (or the ? key) shows the keys for the current screen. Tab hides the panels, ⇧Tab the title bar too, F goes full screen. Settings (⌘,) has four pages: Appearance — language, accent, ratings and preview icons; Library — panel rows, trash and database backups; Import and Export — settings for new RAW frames, the crop rule and file signatures; Storage — the preview cache.
First launch and the licence
How to install the program and open it the first time — step by step, with screenshots: Zerno on a Mac and Zerno on Windows. The build carries no Apple signature and no Windows certificate yet, so the system will stop it on the first launch — this is neither an error nor a virus, it simply does not know the developer; what to press is shown on those pages, once per version.
Then comes the “A licence is needed” window with two doors. Try it for 3 days — no code: for three days the whole program works with nothing held back, you only need the internet at launch. Buy on the website — after payment an activation code that looks like ZRN-XXXX-XXXX-XXXX arrives by email: paste it into the field of the same window and press Apply. Everything about the licence is on the Get a licence page.
The window says the server is not answering? Click the Check connection line under the computer code: the program knocks on all three server names and shows which answered and how fast. The report can be copied or put into an email with Write to us. Most often it is the VPN: some let a browser through but not programs — try without it or with another server.
On the first launch Zerno creates the “Zerno Library” library in the Pictures folder and opens it by itself from then on; the library’s name is in the window title.
Zerno backs up the library by itself — how to go back to a backup is in “What next”. Better not to keep the library in an iCloud Drive, Dropbox or OneDrive folder: the cloud touches the database files while they are in use and can corrupt it; if you create or open a library in such a folder, Zerno warns you. A second library can be made with File → Library › New…, but one is usually enough.
Adding frames
Three ways: ⌘O (File → Add Frames…), dragging files or a whole folder from the Finder onto the window, or the buttons in the middle of an empty library — Add frames… and Add a folder…. RAW from most cameras, JPEG, HEIF, PNG and TIFF are accepted.
From the menu and the buttons Zerno asks Which project?: Existing — pick one from the list, New — the name is filled in from the folder, Library only — no project. Dragging asks nothing: the frames land where you drop them — on a project row in the panel, into that project; on a tag row, with that tag; on the grid of an open project, into it; otherwise just into the library. A folder dropped into the library Zerno offers to make a project of: it is a whole shoot.
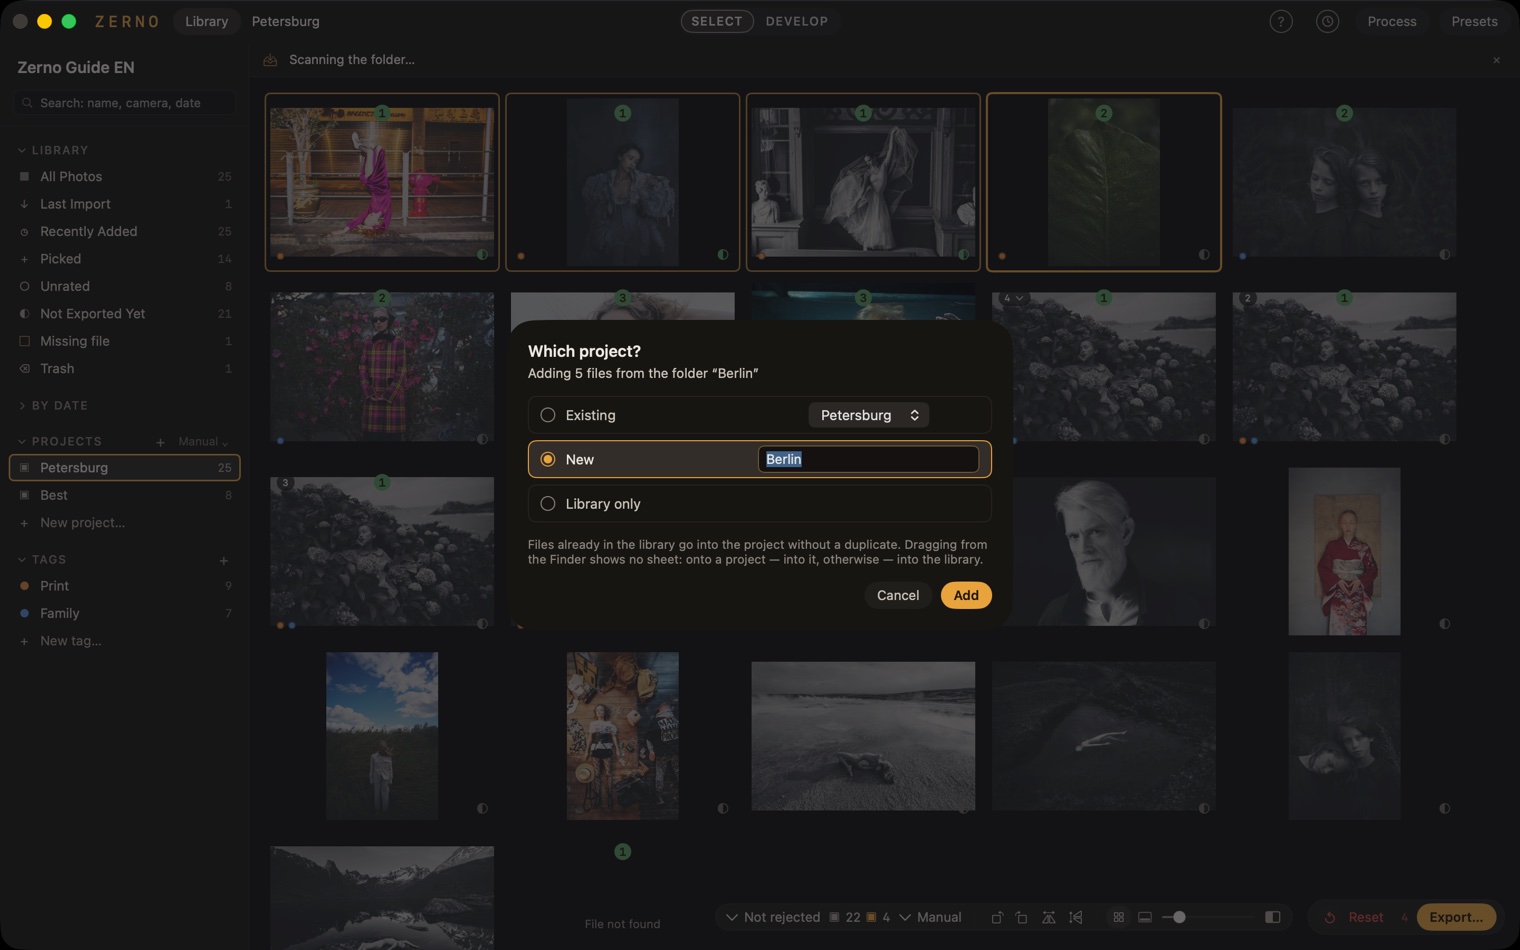
One file, one frame: adding it again does not create a duplicate. The frame and its variants move to the top of Recently Added and appear in Last Import, keeping their process, crop, ratings and history; the chosen project receives the same frame. If the source was lost, adding the matching file again can reconnect it. Frames in Trash are not restored this way. New frames go to the end of All Photos, sorted by file name within each batch.
The library: projects and tags
The Library panel (on the left of SELECT, ⇧⌘L) chooses where the grid’s frames come from. At the top is the search field: a file name, camera, lens or shooting date is looked up inside the open source (⌘F, Esc clears it). Then come All Photos, Last Import (what came in last), Recently Added (the past week, newest first), Picked, Unrated, Not Exported Yet (with a process but not exported), Missing file (the row only appears when there are such frames) and Trash. Below are BY DATE (years, months and days of shooting), PROJECTS and TAGS. Every section collapses with a click on its heading, and which rows to show is chosen with checkboxes in Settings (the Library page): by default the panel is short, the rest is there when you need it.
A project is a shelf. You put frames on it by dragging them from the grid onto the project’s row. One frame can sit on several projects, and an edit shows everywhere it sits: it is one and the same frame, not a copy. A new project — the “New project…” line at the end of the section, or ⌘N; a right click on a project gives Rename, Archive, Move to Trash and Move to Trash with Frames. The order of projects is set with the picker in the section heading: manual (by dragging the rows), by name or by date. A project in the trash does not touch its frames: they stay in the library and on other projects. Move to Trash with Frames (⌥⌫ on a project row; ⌫ just moves it to the Trash) takes its frames too, except those also on other projects; in the Trash such a project is a single row with a Put back project and frames button. A finished shoot is handy to archive — into a collapsed section below the projects. Dragging frames from one project to another with ⌥ moves them; without ⌥ it puts them on that one too.
A tag is a coloured label on top of projects: “to print”, “for the competition”, “family”. A new tag — the “New tag…” line: a name and one of eight colours. To tag frames, drag them onto the tag’s row, tick it in Frame → Tags, or press ⇧1–⇧9: the key sets and clears the tag by its place in the panel, ⇧0 clears all tags from the frame. On the preview, tags are coloured dots at the bottom left. Click a tag’s row and the grid shows the frames that have it, just as with a project.
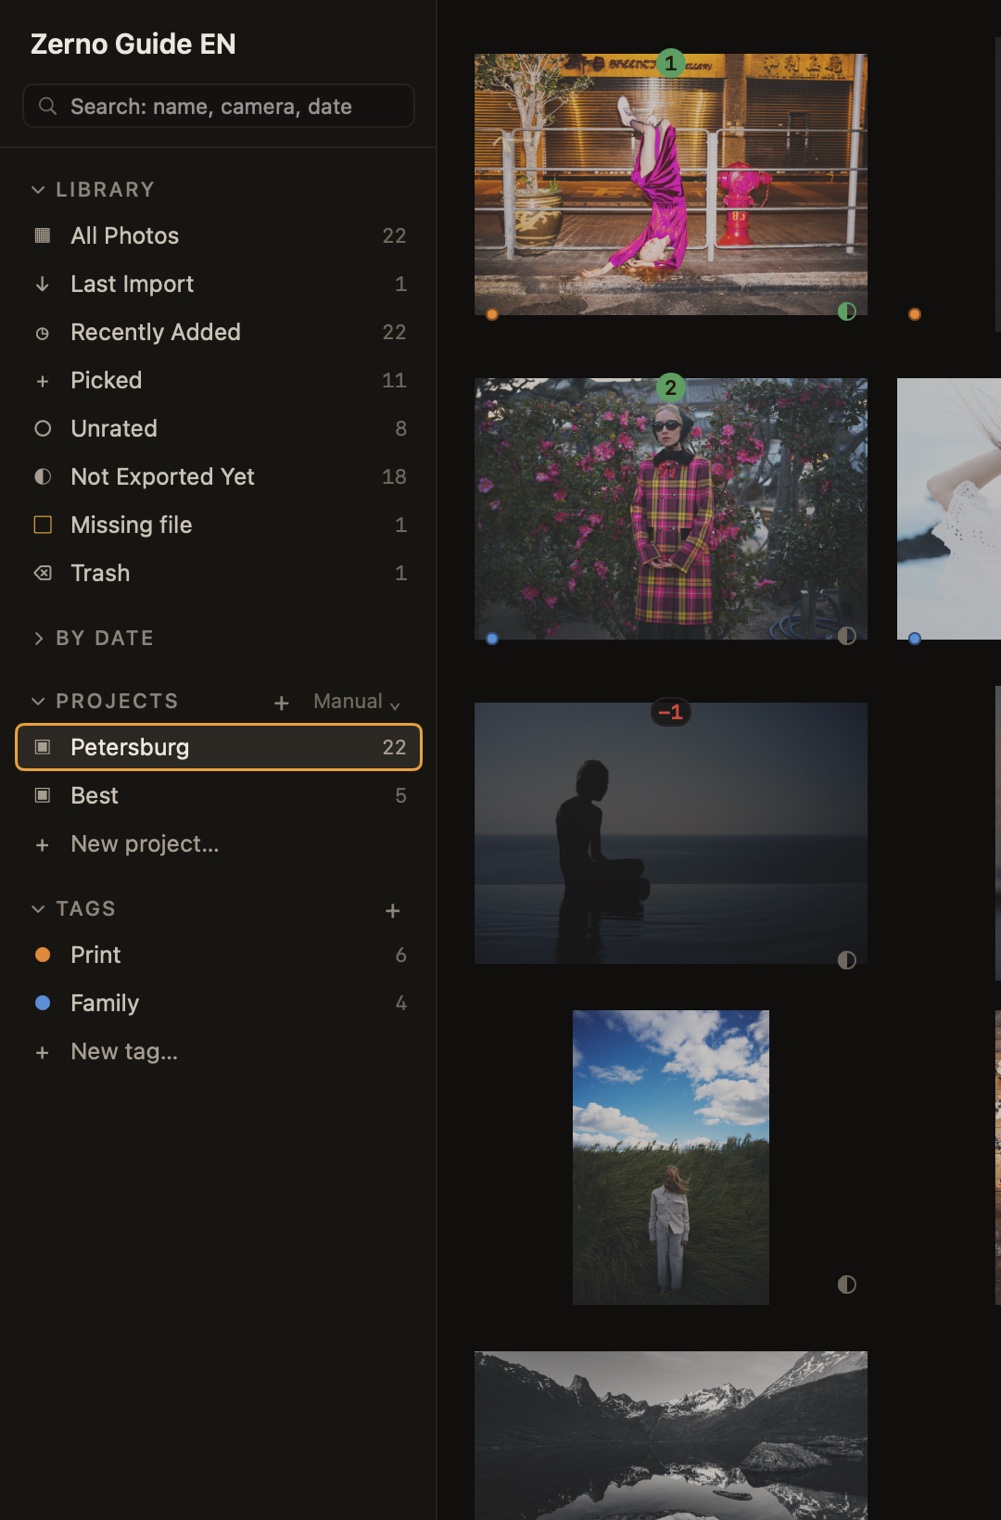
Delete (⌫) does what the place means: in a project it takes the frames off the project (they stay in the library), in All Photos and Recently Added it moves them to the trash. ⌘⌫ moves to the trash from anywhere. Both are undone with ⌘Z. In Trash there is a strip at the top: Put back returns frames and projects to their places, Empty Trash… removes them from the library for good, along with their process and history. Zerno never touches the files on disk.
A file has moved or the disk is not connected — the frame does not disappear: its process, rating, tags and history stay with it, and in place of the preview is a stand-in, “File not found” (or “Disk not connected”, “Unreadable”). Such frames are gathered in the Missing file row. Locate… — on the stand-in, in Info and in Frame → Locate File… — searches by content, not by name: point it at a file, a folder (every missing frame in it and its subfolders is found) or the whole disk. Plug the disk back in and the frames come back by themselves. The export skips frames without a file.
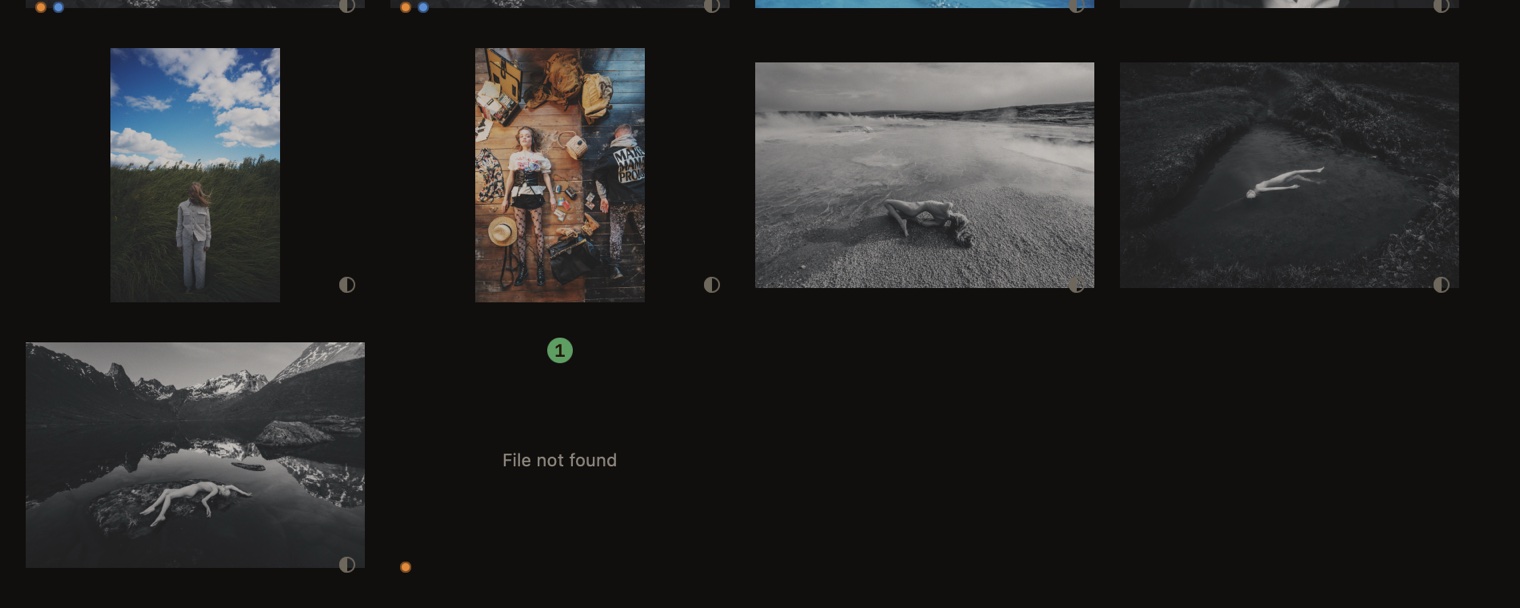
SELECT: picking
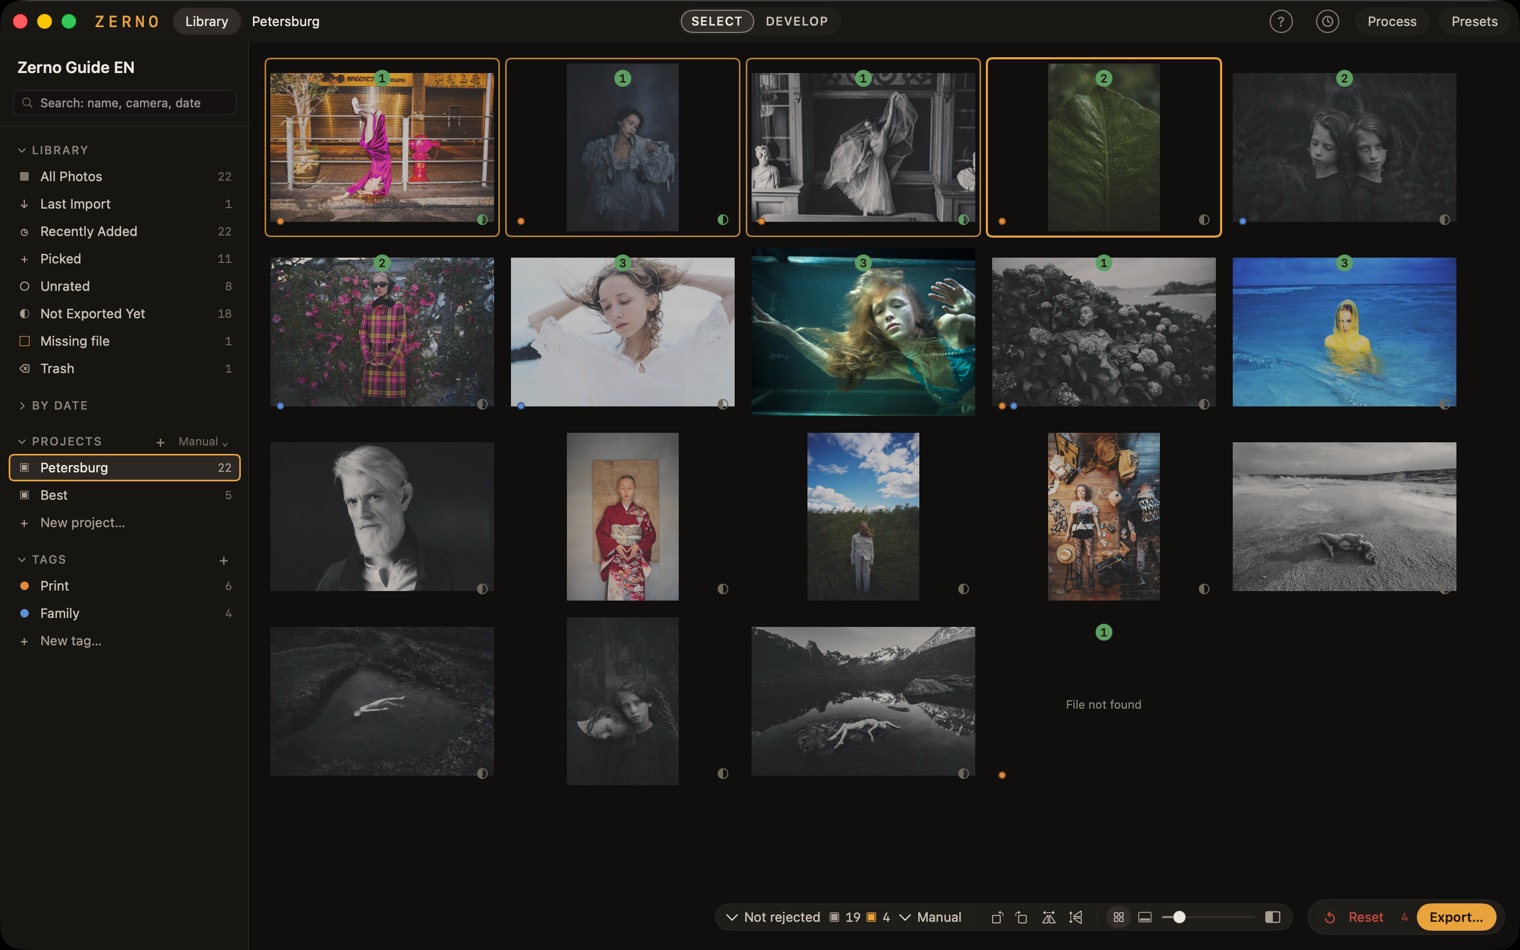
The grid shows previews from the title bar all the way down, with no captions: the tooltip on hover shows the file name and the capture date. Everything about how you look at the grid lives in a bar floating at the bottom over the tiles: the rating filter (one picker with All, Picks, Not rejected, Rejected and exact ratings), the order (by date added, by name, by capture time, by rating, and on a project also manual — drag the tiles with the mouse; the direction is in the same menu), rotate and flip, the preview size and the before/after sign: on, the previews go through their own process; off, the grid shows the originals. The rule is simple: the panel on the left chooses where the frames come from, the bar — which of them and in what order.
You pick with a rating — a number. O — pick: a frame with no rating gets +1, a pick goes one higher. X — reject: −1, a reject goes lower still. + and − move the rating by one, the digits 1–5 set it at once, 0 clears it. The rating sits as a badge on the preview: a number on green for picks, a red number for rejects — and the frame itself dims; no rating, no badge. Where the badge sits is chosen in Settings, “Rating in the grid”. The rating belongs to the frame: it is the same on every project.
⌘⌥1, ⌘⌥2 and ⌘⌥3 are a quick filter: all, at least 0 (no rejects), at least 1 (picks). The filter hides the rest in the grid, when stepping through frames in DEVELOP and in the contact sheet alike.
You can work on several frames at once: ⇧-click and ⇧-arrows extend a range, ⌘-click adds and removes one at a time, ⌘A takes everything visible, a marquee dragged from the gap between tiles takes everything it touches (with ⇧ or ⌘ it adds to the selection; the filmstrip works the same way). Ratings, tags, rotations, pasting a process, Delete — everything applies to the whole selection, and one ⌘Z undoes the whole batch. A bright accent border marks the current frame (the one Enter opens), a dimmed one the selected frames.
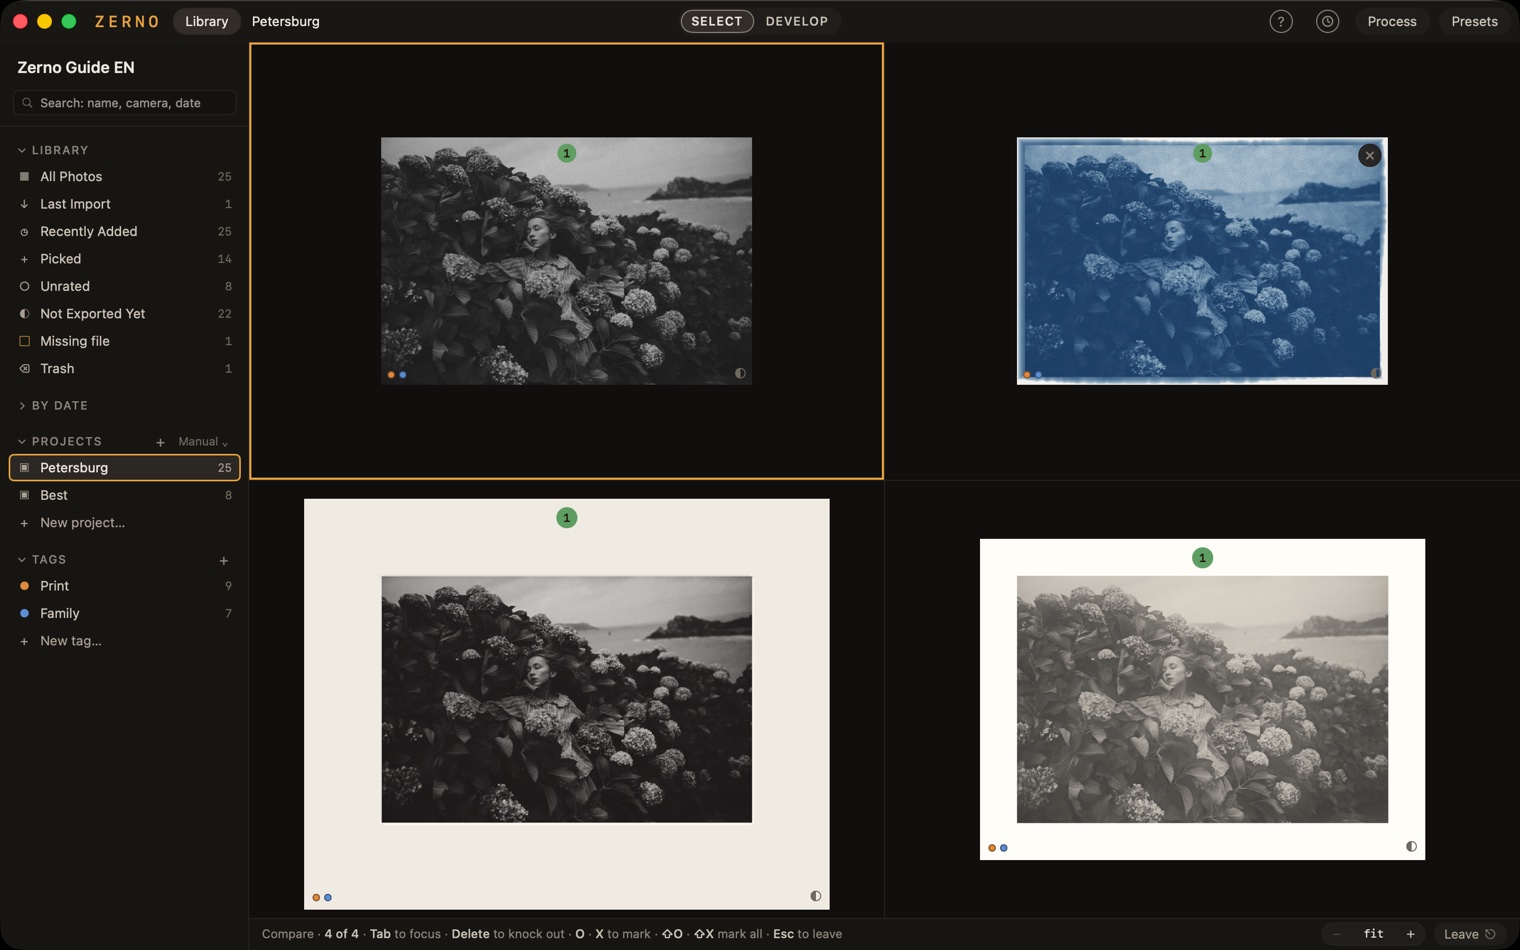
To compare takes side by side, select two or more frames and press B. Up to eight are on screen, with a shared zoom up to 1:1; arrows at the edge move through the list. Tab, arrows or a click pick a frame; O, X and digits rate it, ⇧O and ⇧X rate every frame on screen. The cross in the top-right corner of the hovered frame removes it from the comparison, like Delete; the last frame has no cross. ⌘Z or Bring back restores a removed frame. Space opens it in DEVELOP; Esc, B or Leave ⎋ returns to the grid with the remaining frames selected.
To check sharpness without opening a frame, hold Z over a tile — a loupe shows the frame at 1:1 under the cursor; let go and it is gone.
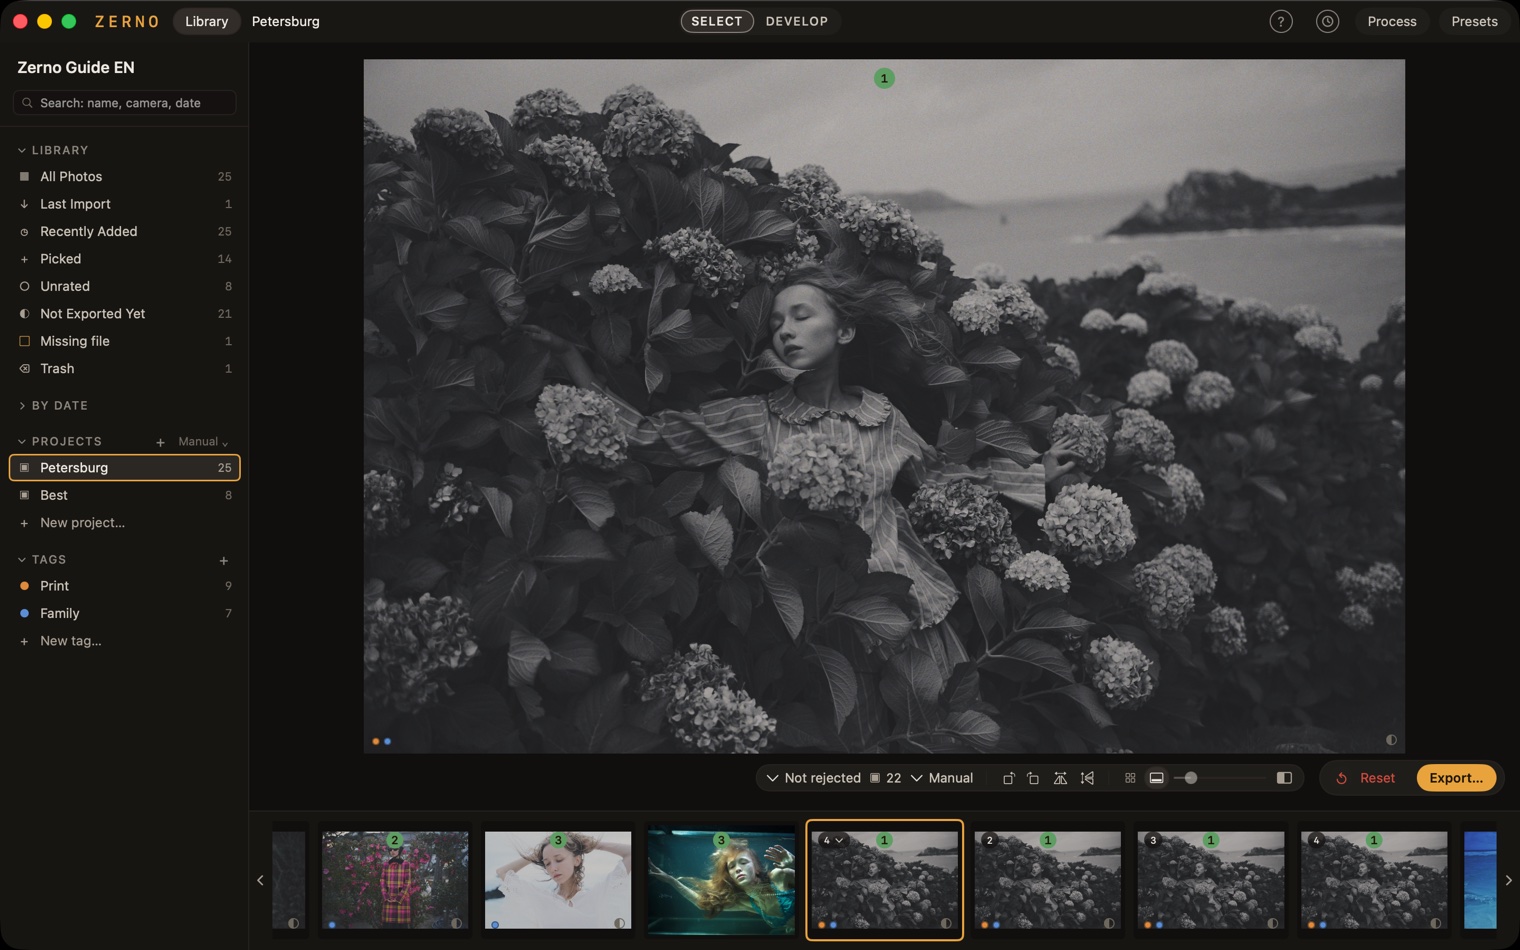
Filmstrip is the second view of SELECT: the L key or the sign in the bar. The frame under the cursor goes large, the rest form a strip of tiles below; ← → browse instantly, ↑ ↓ raise and lower the rating; the other keys are those of the grid: rating, tags, B to compare, Space to DEVELOP, Z for the loupe. Handy for picking through a shoot in a row. The view is remembered per source; L or Esc returns to the grid.
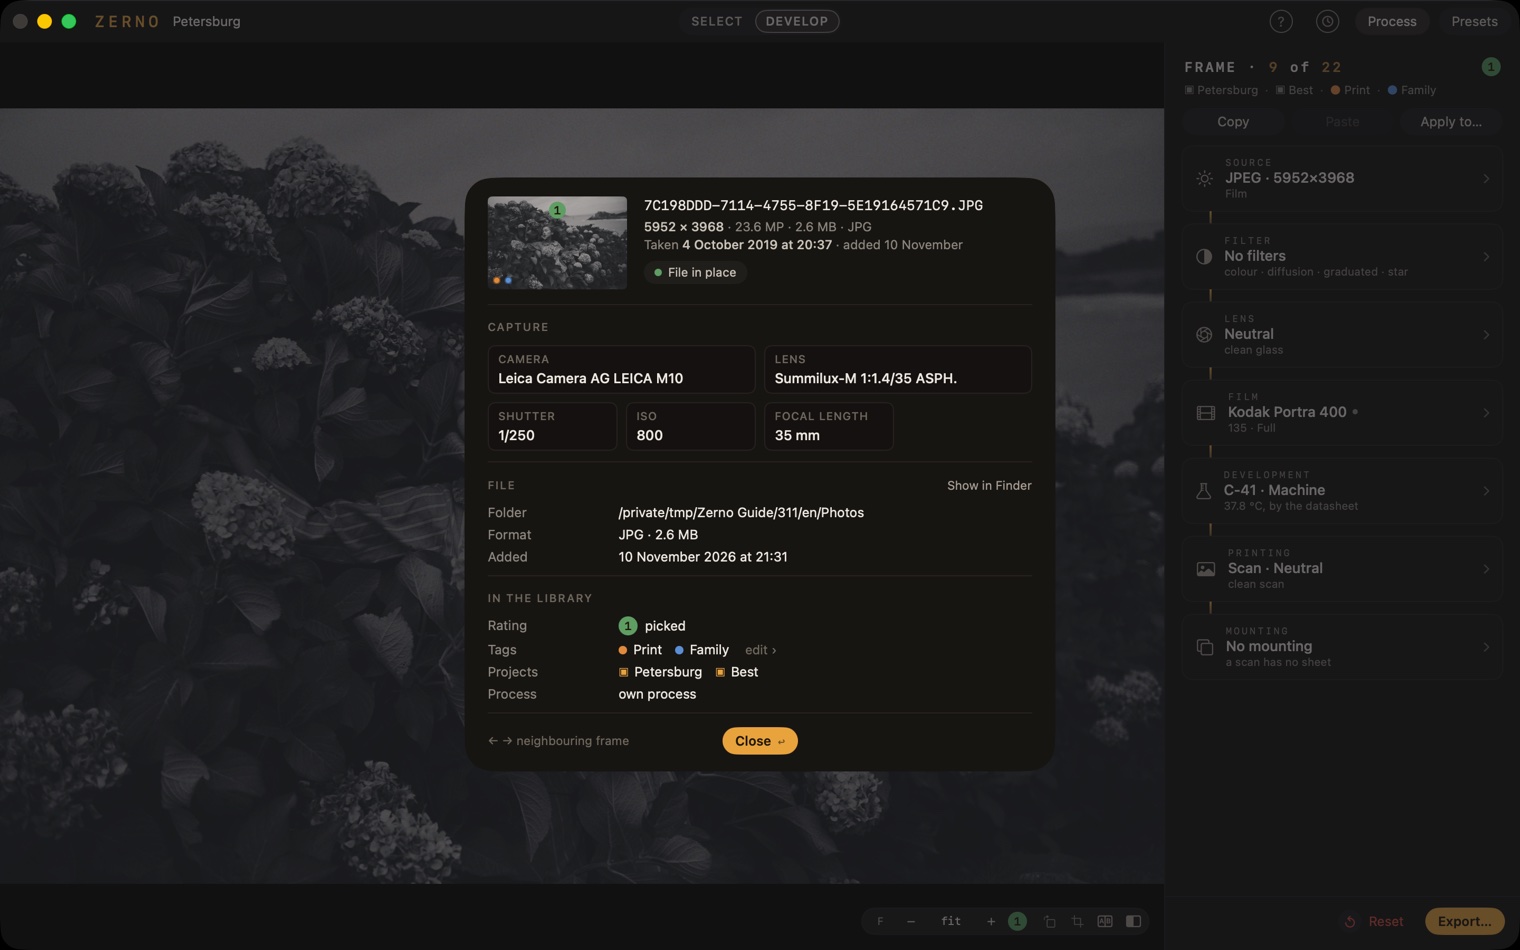
Everything about the frame is in Info (⌘I or Frame → Get Info…): a preview, the file name and whether the file is in place, the capture (camera, lens, shutter speed, aperture, ISO, focal length), the folder and format, and at the end the rating, tags, projects, process and when the frame was last exported; ← → step to the neighbours. Right-click a frame for a grouped menu: open, compare, export; rating and tags; projects; process; rotation and crop; the file; Trash.
Frame variants. Frame → Make Variant (⌘') adds a second frame from the same file with its own process, crop and rating: print one shot both in colour and in black and white, and export both. In SELECT a variant is made for every selected frame, in DEVELOP for the open one, which then opens. Variants sit behind their original in the grid as a stack: the original shows a pill with the number of frames and a triangle in its top-left corner — a click on it expands or collapses the stack — and variants show their number; two sheets peek out from behind a collapsed stack. B on a frame with a stack compares the original with all its variants. Exported variants get “_v2”, “_v3” in the name; Info says which variant it is and of what. A variant goes to the Trash on its own; the original too, or with Move to Trash with Variants.
At the bottom right of the preview is a single icon: ◐ — the frame has its own process, a green ◐ — it has been exported, a green dot — exported without a process. JPEG, HEIF, PNG and TIFF without a process stay as originals. A new RAW frame receives the Neutral process with the import settings immediately. Which icons to show is chosen in Settings, “Tile icon”.
DEVELOP: finishing a frame
Space, Enter or a double click — the frame opens full size. ← → step through the neighbours in the same source, filter and order as the grid; Space or Esc go back to the grid. Delete here does what it does in the grid, and the neighbour opens.
At the bottom, over the frame, is a bar: the stage badge, zoom, the rating badge, rotation, crop and two buttons on the right — A|B and ◧. The letter in the stage badge is P while the preview is on screen and F once the master is done — exactly what goes into the file; while the master is being calculated, an arc grows around the letter. A click on the photograph or on the zoom number switches between fit and 100 %, Z is 100 %, ⌘0 fits, a pinch works on the trackpad, and ⌘ + scroll wheel zooms towards the point under the cursor. A click on the badge raises the rating, a right click lowers it, a ⌘-click clears it. ◧ shows the original before developing until you press it again (any edit to the process brings the processed view back by itself); holding ⌥ does the same while you hold it. Whether the bar sits on the right or in the centre is chosen in View → Floating Bar, and it can be hidden there too.
At the top of the rack are “FRAME · 7 of 21” (the frame’s place in the grid) and the rating badge, and under them the frame’s projects and tags in words; a click on that line opens Info. Reset and Export… sit on the right under the open panels, and with no panels — as a floating group at the bottom right. Reset returns a developed file to the original, and RAW to Neutral with the new-frame settings (⌘Z brings the previous process back); in SELECT it applies to all the selected frames.
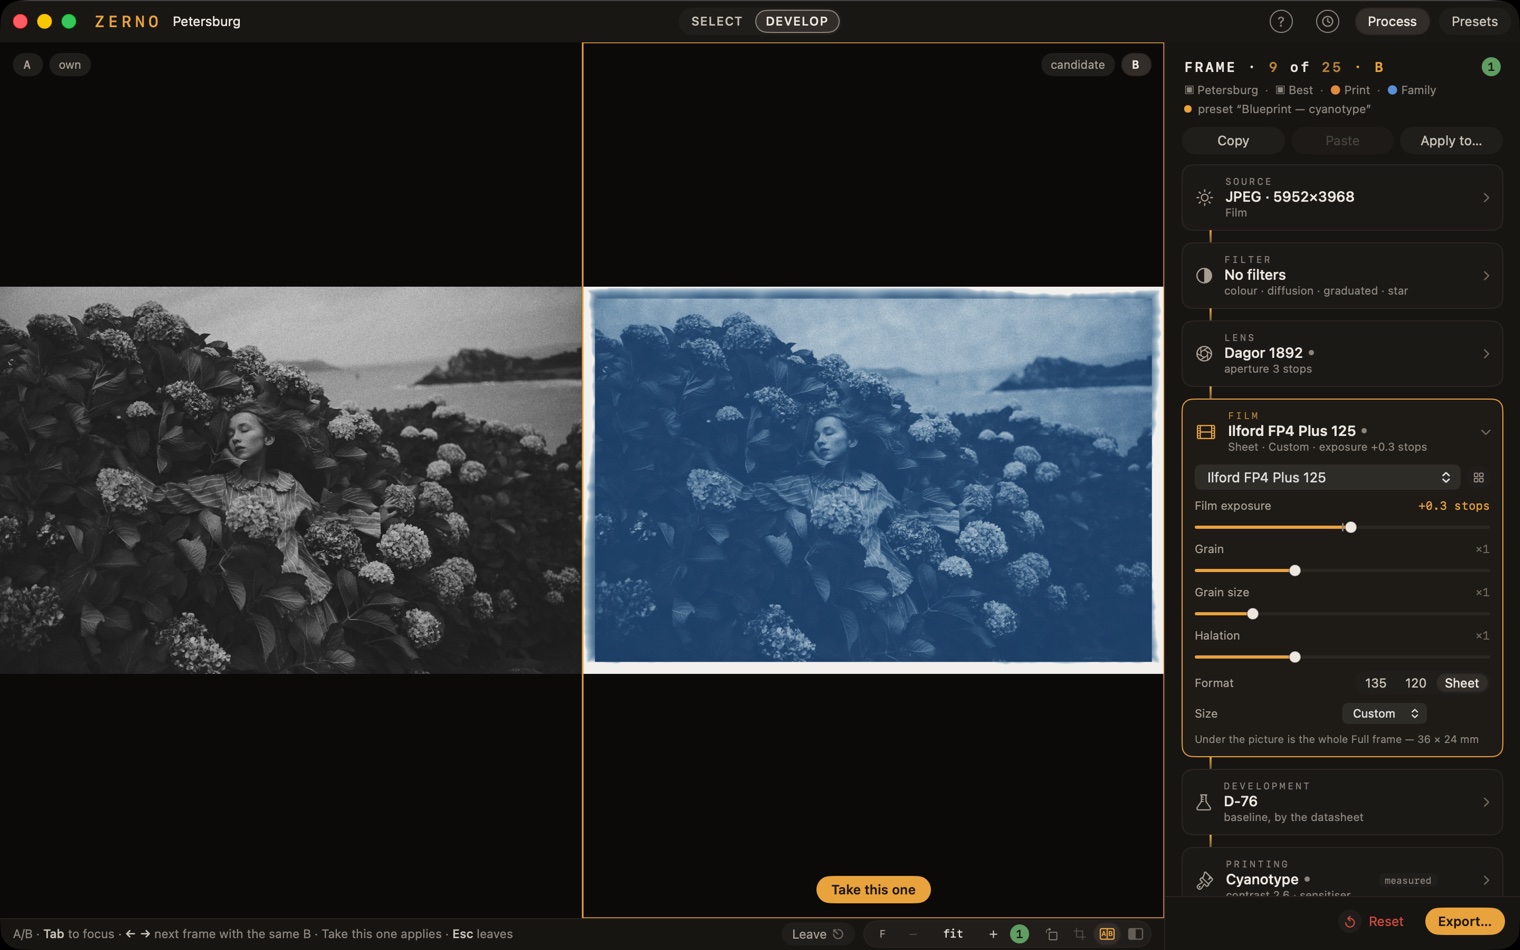
A/B — two versions side by side. The B key or the A|B button puts two copies of the frame’s process side by side — handy for comparing two films or two papers on one shot. Tab moves the focus, and the rack edits the version in the frame. Until you choose, the frame does not change: under a version that differs from the frame a Take this one button appears — press it and the frame gets that version, while A/B stays on. ← → step through the neighbours without leaving A/B: on the left each frame’s own version, on the right the same version B, so you see how one set of settings sits on different shots. Esc, B or the Leave ⎋ button on the right of the bottom bar leave without changes. Exporting from A/B writes the version in the frame.
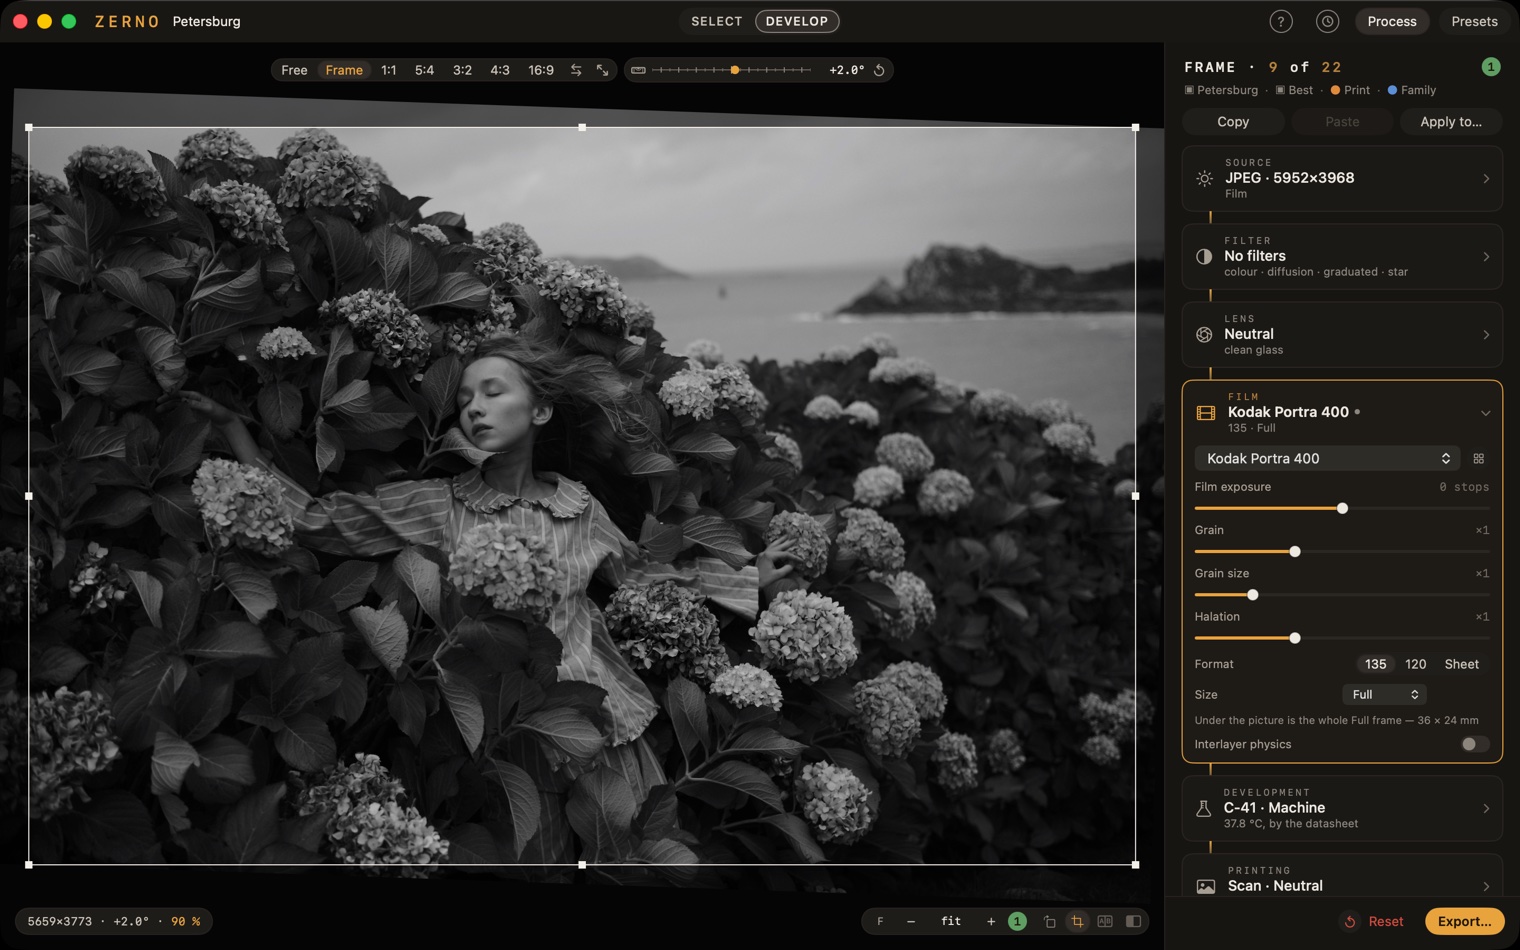
Crop — the C key or the ⌗ button on the bar. The shot is shown whole and unprocessed, with a frame on top: drag its corners and sides, drag inside to move it. Above are the ratios (among them Frame — the whole frame of the chosen film size), the ⇄ button and, next to them, the tilt ruler. The horizon is easier to level with a ⌘-drag along it — the program works out the angle. Return applies, Esc cancels, ⇧C clears the crop entirely — the frame, the ratio and the tilt. While the frame is cropped, the ⌗ sign lights up in the accent colour. The crop is taken from the input: no resolution is lost, the master is simply computed from a smaller area. A standard film size (6×6, 4×5, XPan…) does not set a crop — the film itself trims it inside your frame, and the tool shows it as a dashed outline.
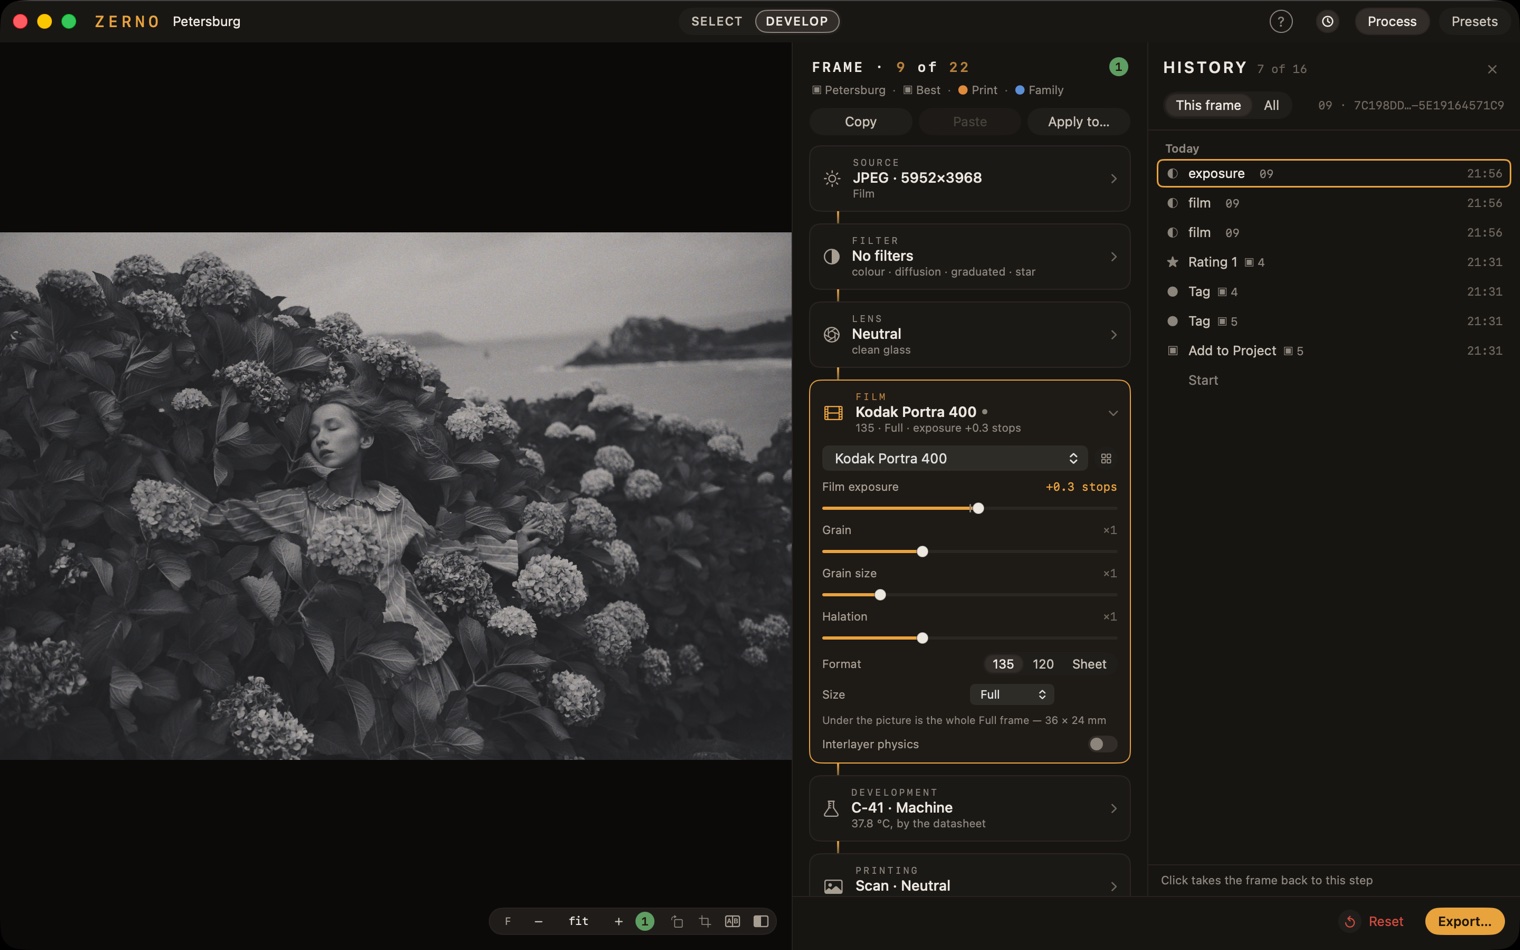
History — the round clock icon in the title bar, or ⇧⌘H: the steps, newest on top, by day, each with what changed and when; the last line is “Start”. History is kept in the library with no limit and survives a restart: ⌘Z in the morning undoes yesterday. In This frame you see the steps of the open frame (in SELECT, the frame under the cursor), and a click takes the frame back to any of them — as a new step, leaving the other frames alone. All is the whole history: a click jumps to the step, like ⌘Z as many times as needed, and ⇧⌘Z brings back what is undone above it.
The process rack: where to start
The rack applies to this frame. JPEG, HEIF, PNG and TIFF without a process are shown as they are: the first edit starts processing from Neutral. A new RAW frame already has the Neutral process with the exposure mode from the import settings. In SELECT the rack edits the frame under the cursor.
A collapsed card tells you the main thing in three lines: which block it is, what is chosen and which knobs have moved. On the right are the “touched” dot, ↺ (return the block’s knobs to their defaults) and the chevron. To change the film, the lens or the paper, expand the card with a click on its header. A knob’s number can be typed: click it and enter, say, 0.67; a double click on a knob returns it to its default. What an unfamiliar knob does is in its tooltip — hold the cursor on it.
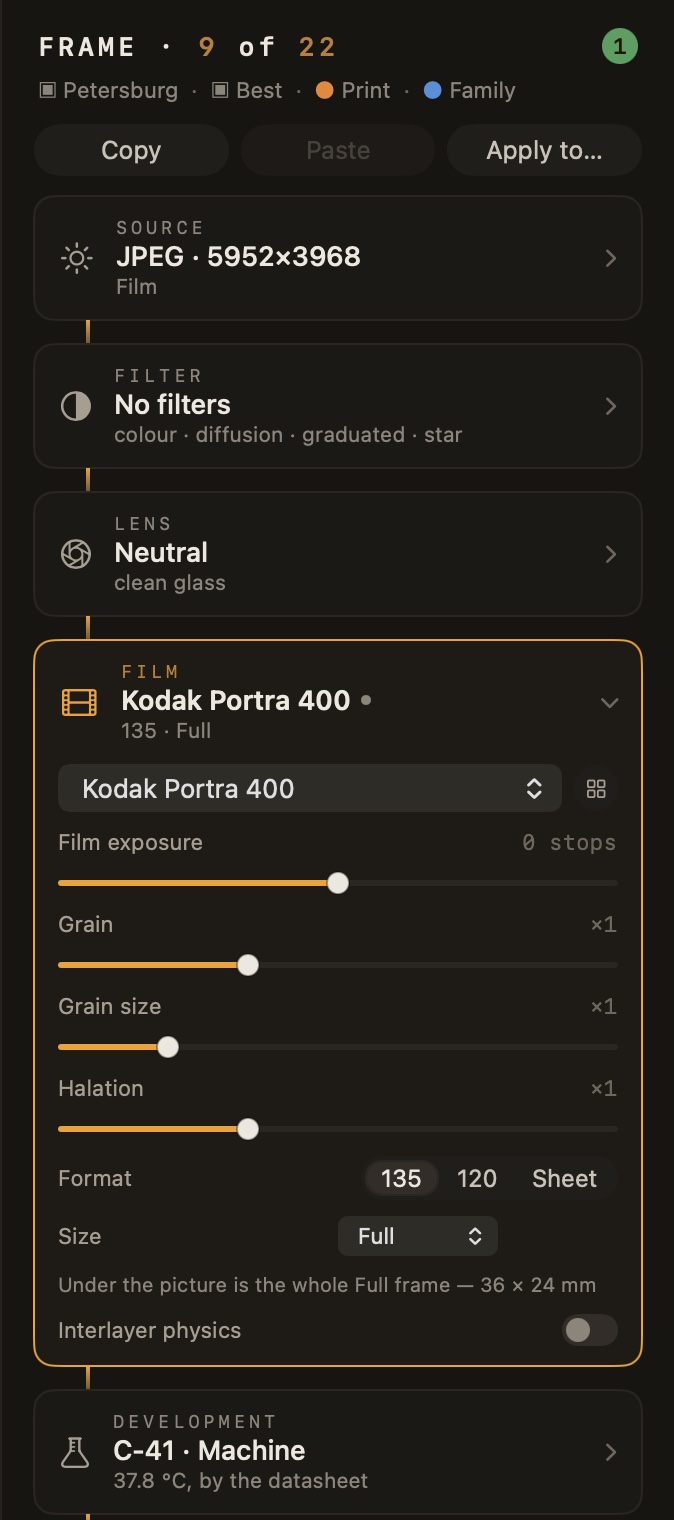
Don’t touch everything at once. An order worth starting with:
- FILM — the emulsion. This is the main decision: each has its own curves, colour and grain. For a colour frame start with Portra 400, for black and white — Tri-X 400.
- Exposure — right under the film choice: if the frame is dark or light, move it by a stop. Film forgives overexposure more readily than underexposure.
- PRINTING — what we look at it on: a scan (the way film is most often seen), B&W or colour paper, old processes, reproduction or a screen. Paper has knobs of its own — contrast and brightness (to the right is lighter); the borders and the film rebate, the sheet’s tint and texture live here too.
- LENS — the lens and the aperture. Wide open gives character: glow, vignetting, swirl; stopped down gives a clean drawing.
- FILTER, DEVELOPMENT, MOUNTING — once the base already looks right. DEVELOPMENT has the developer and the push, and for a negative also solarisation — the Sabattier effect.
SOURCE — the first card — is about the light that reached the film. RAW has six exposure modes: As shot · As camera · Auto · Auto* · Protect highlights · Protect shadows, plus white balance. As camera matches the midtones to the embedded camera picture; if a comparison is unavailable, it uses Auto*, limited to two stops from the shot. Choose the mode for new RAW frames in Settings → Import and Export; the default is As camera, and changing it leaves existing frames alone. JPEG, HEIF, PNG and TIFF have Highlight headroom: it boosts bright areas before film processing for halation and glow. It does not recover detail already lost in the file.
Not sure which film to take? The ⊞ button next to the film, lens and printing-process choice and by each filter slot opens proofs: the frame gives way to a grid — this same frame with your process in every film (lens, printing process, filter). A click or ↩ applies and keeps the grid, Esc goes back to the frame. The slider below goes from six tiles per row to one at full width; hold Z over a tile and the loupe shows the grain at 1:1.
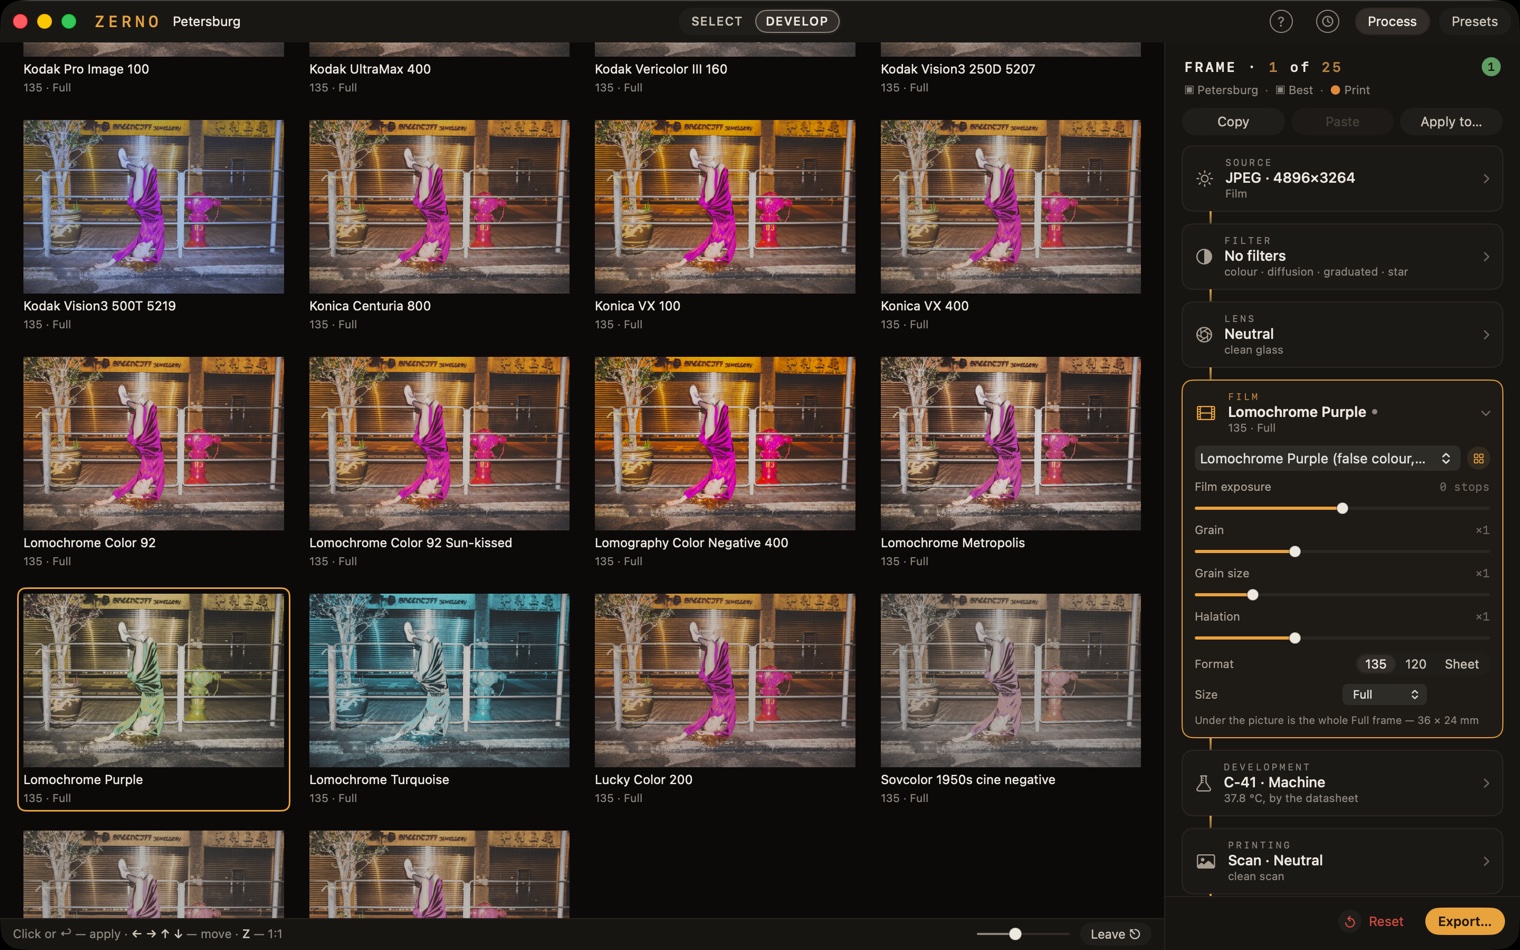
Where a process has random unevenness — tank streaks, the spots of an instant card, the pour of a plate, the film rebate — the block has a Reroll unevenness row with a die: a click lays it out anew and everything else stays in place.
To hand a process to other frames — Copy and Paste (⌥⌘C and ⌥⌘V; pasting goes to every selected frame) or Apply to…: these three buttons are at the top of the rack, and also in the Frame menu and on a right click on a frame. There is nothing to break: ⌘Z undoes step by step, ↺ returns a block to its defaults.
The full list of what is inside — by name and with numbers — is on the What’s inside page.
Presets
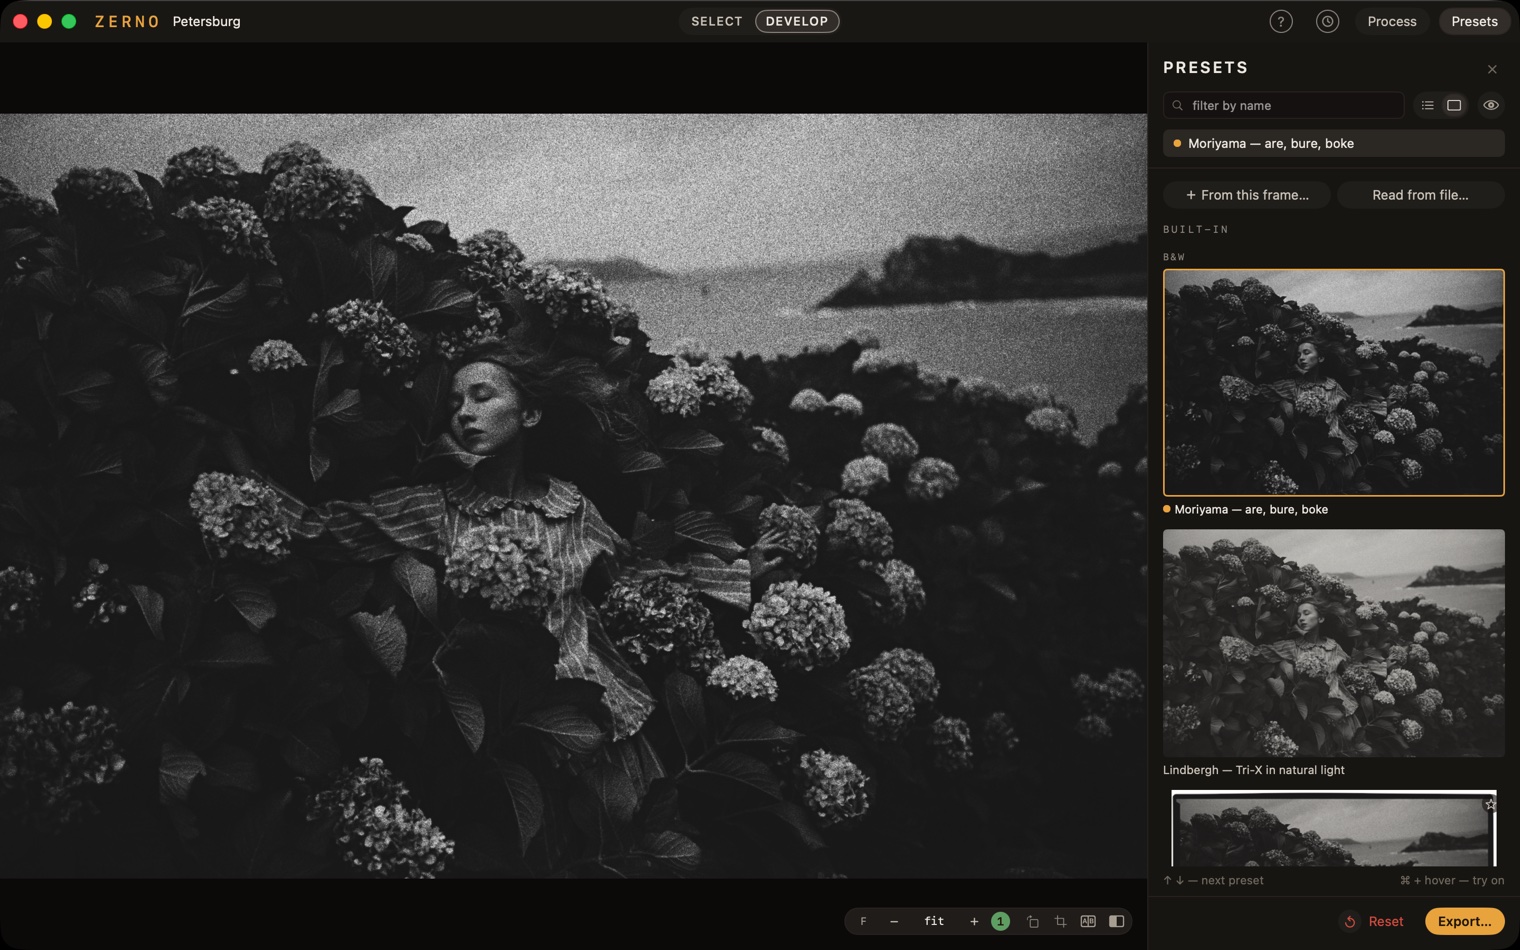
The Presets button in the title bar opens the presets panel. It shows your current frame through each preset — as full-width tiles or as a list (the switch is next to the search). There are 48 built in, grouped: black and white, colour, slide, historic processes, instant. The star adds a preset to Favourites — they always come first.
A click applies the preset to the frame (in SELECT — to all the selected frames), a right click gives “Apply only…” for a single block of the rack. In the grid and DEVELOP, ↑ ↓ step to the next preset and apply it while the panel is open. In the filmstrip, ↑ ↓ always change the rating, even with the presets panel open. Hovering by itself changes nothing; to try on a preset without applying it, hold ⌘ and hover — let go and the frame is as it was. If you would rather always do that, turn on the eye in the panel (“Try on by hover”).
A preset is a stamp, not a link: it copies settings, and from then on you turn them as you like. Built-in presets preserve RAW decoding settings; some change temperature or highlight headroom. A custom preset that includes SOURCE can carry its settings too. A preset cannot crop: the frame size (6×6, 4×5, XPan) is yours alone to set. Open the rack after “Moriyama” and you see what it is made of: Tri-X, a push, Rodinal developer, uncoated glass; any preset can be taken apart and remade to taste. The top of the rack says which preset the frame starts from — “preset Moriyama”, and after your edits “· changed”.
Your own preset — the + From this frame… button, the first line of the list. A .zpreset file can be sent to another Zerno user — it opens for them through “Read from file…”. Deleted a preset by mistake? A strip with a Put back button appears in the panel.
Export
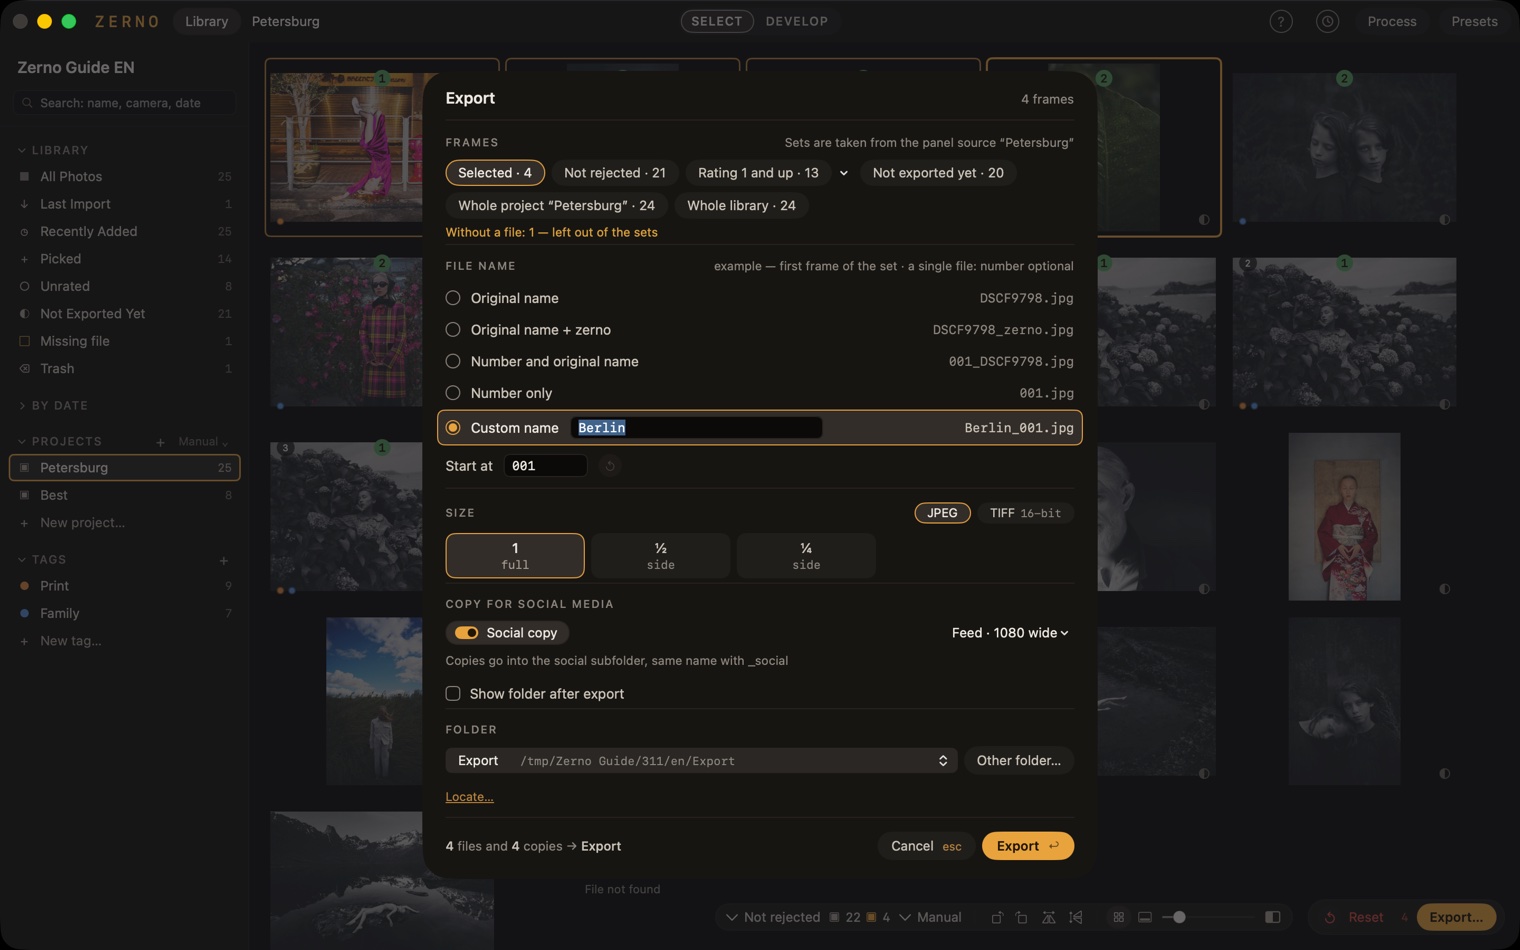
Export… — the button at the bottom right, or ⌘E; ⌥⌘E opens the same window for a single frame. Export is one window: the set of frames, the file name, the format and size, the copy for social media and the folder; press Export and writing starts right away.
The set is capsules, all in view, each with its number of frames: Selected (the selection, or the frame under the cursor or the open one when nothing is selected), Not rejected, Rating n and up (the number is chosen right in the capsule), Not exported yet (frames with a process that were never exported or were edited after export), Whole project or Whole tag when a project or a tag is open in the panel, and Whole library. The sets are counted from whatever is chosen in the Library panel, in grid order. The window picks Selected itself, and Not rejected when nothing is selected. Frames without a file are left out of the sets — the window says how many.
File name — one of five rules, each with an example on the first frame of the set next to it:
- original name —
MED06316.jpg; - original + zerno —
MED06316_zerno.jpg(the default: the original next to it is never overwritten); - number and original —
007_MED06316.jpg; - number only —
007.jpg; - custom name — type “Berlin” and get
Berlin_007.jpg, and when there is a single file — the whole name, with no number.
The number is the frame’s place in the set, with leading zeros, so the files sort in order. If the folder already has such files, Zerno asks once for the whole set: replace them, keep both (the new one gets “ 2” at the end of its name) or continue the numbering — if the folder already holds 001…012.jpg, the set starts at 013.
Format — JPEG, or 16-bit TIFF for print and layout; size — 1, ½ or ¼ of the side. Everything around the frame — rebate, borders, mount — grows the canvas, while the frame itself stays pixel for pixel. Copy for social media — the Make social copy switch: next to the master, in a social subfolder, goes a reduced copy of it (the same print taken smaller) — 1080 wide for a feed or 2048 on the long side; the copy is always a JPEG. The folder is chosen in the same window: the last seven are in the list, any other with “Other folder…”.
While an export is running, the button becomes a progress bar — “3 of 12 · ~1:20” — and the export can be stopped: what has been written stays. Exported frames get a green icon on the preview. The file keeps how it was made — “Read from file…” in the presets panel builds a preset from it (Settings → Import and Export → “Write the process to files”).
Contact sheet — File → Export Contact Sheet… or ⇧⌘E: a PDF with exactly the frames, and in the order, that are in the grid right now.
Keys that will do
.zernoWhat next
The history of edits is kept in the library: as many steps as you like, and after a restart ⌘Z undoes yesterday. Adding frames, the order of All Photos, exporting and emptying the trash are not steps: they are not edits to frames.
If something has gone badly wrong — File → Library › Restore from Backup…. Zerno backs up the database by itself — when it opens and once a day when something changed — and thins out the old backups by itself: a week of daily ones, a month of weekly ones, half a year of monthly ones. Pick a date — the backup takes the database’s place, and the current one is kept as a “before restore” backup. The backups live inside the library itself, and a library in Pictures is included in the system’s backups.
To see how one scene looks on different films and papers — Gallery. Everything inside, by name — What’s inside; from the app — Help → What’s Inside. What changed in the current version — What’s new. Frequent questions and what to do when something goes wrong — Support. Not found — write to us: ask@zerno.photo.